 Implementing Nearest Store Locator using our server
The following steps implement a Nearest Store locator functionality for you web site where the user enters a full Postcode and gets a list of nearest Stores to that postcode.
Using this option you load the list of stores into our database, and then make a simple request for nearest Stores to a given Postcode. The call returns your Store data, merged with your template, to format the output into HTML which can be directly written to a web page. You have total control over the appearance of your page.
A more advance call is available to return a Google map with map pins, which when clicked on can display data from your templates in up to four tabs. The pins can also have different Icons to allow you to display other points of interest, other than your stores.
Implementing Nearest Store Locator in 7 easy steps:
The above Postcode Lookup for Full Address Search functionality can be added to a PHP capable web site in minutes, by simply dropping the supplied files into your Web project.
- Step 1: Install Importer in default location
- Step 2: Open an account with us
- Step 3: Buy a Store Location Pack
- Step 4: Upload your data
- Step 5: Create Templates to merge your data
- Step 6 Test your page
- Step 7: Integrate into your Web Site
Referance
Step 1: Install "Store Locator" Importer in default location
The NearestData.xls spreadsheet allows a user to upload, and manage, data to our server to give Nearest functionality easily. At the time of writing we support PHP, classic ASP and .NET.
Requirements
• Microsoft Excel 2000 onwards
• Nearest Importer installed on each PC
• Account open with us
• Have paid for a Store Location List
| |
Download Uploader and Example code |
Having installed the NearestImporter.exe, the spreadsheet buttons will call this program to upload the data to our server. If you opted to install, the uploaded in a different location to default, you will need to edit cell C10, on the settings tab.
Step 2: Open an data account with us
Use the option from top right of this web page. When you open an account, we will send you a License ID and Datakey. These need to go in the "Settings" sheet.
Step 3: Buy a Store Location Pack
To allow you to upload data to our server you need to purchase a "Store Location Pack". To trial the system, simply use LicenseID=0, this will give you access to the demo Store Data and Templates contained in the spreadsheet.

Step 4: Upload your data
Firstly DO NOT ADD/REMOVE ROWS/COLUMNS in the sheets, as the up loader program expects data in certain cells and columns.
The “NearestData.xls” included in the download contains all data and templates used to create the demo web page, thus you can see the various options to create such functionality. Demo of this data
We suggest that you then use the Template and Data List that matches your requirements the most.
For Example
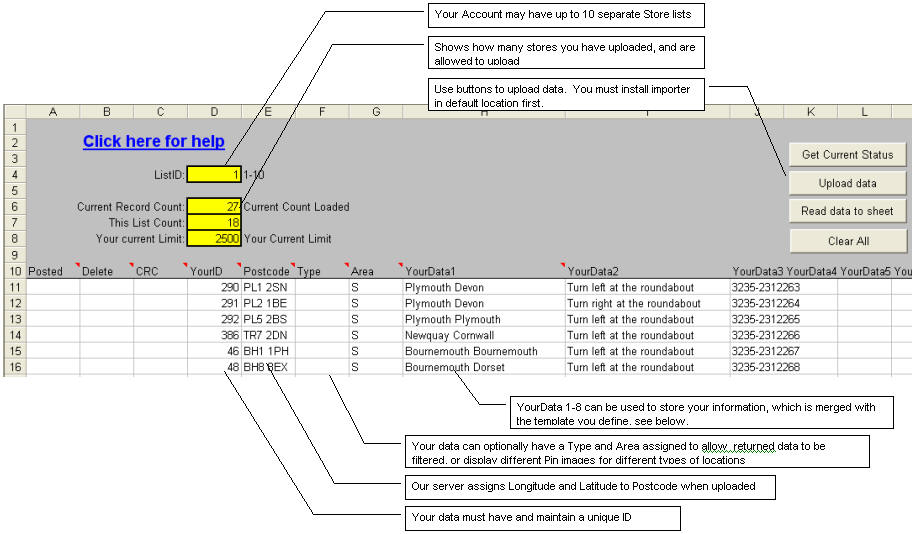
PostCode
We can see we have the Postcode in column E. When uploaded the system will add the Longitude and Latitude to the entry in our database, to allow calculation of nearest list.
Note : The PostZon Database does not have Longitude and Latitude for PO boxes. Thus you must find the nearest Postcode to any PO Boxes yourself manually.
Your Data
We then have the data you want to actually display in columns H onwards, YourData1-8. We will see how we use this in step 6. The YourData1-8 entries can contain a whole section of HTML or JavaScript if need be.
In this example:
- YourData1=Store name
- YourData2=Simple Directions
- YourData3=Phone Number
In YourData4, you could then add a lond description such as Store feature, Directions or any other data.
Unique ID
You must not change the Unique ID in column D after an upload. This allows the program to update entries when you actually change the data.
How do I delete records
To delete data, simply put an X in the “Delete” column B, then update the data. This will delete entries on our server. It is then safe to delete the row from the spreadsheet.
Step 5: Create Templates to merge your data
The Templates drive the system, as they allow you to change the HTML (JavaScript can be included) code returned for each Nearest Store Location record, Header and Footer of the list. Giving you total control of the look and feel.
The returned HTML code is then squirted into your own web page to display the results.
The 7 examples in the downloadable sheet correspond to the 7 examples on the Demo web page. Demo of example 7
Pick the one that matches your requirements best then edit that template.
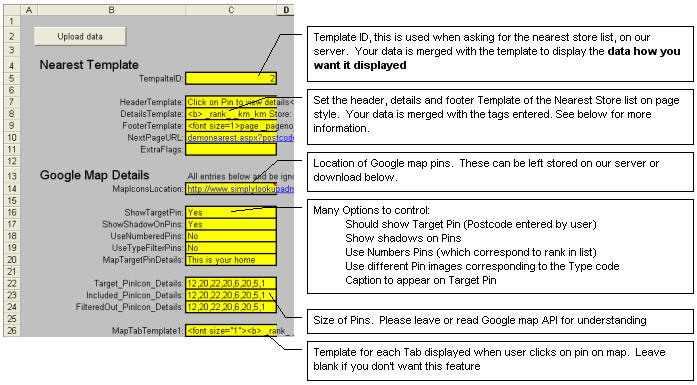
Cells C7-C9 and C26, contain HTML with is merged with the Store data to return the results displayed how you want it displayed.
| |
Download Uploader and Example code |
Template Example:
| Click on Pin to view details<br><h2>Example 2: _recordcount_ Stores Found</h2><font size=1>page _pageno_ of _nopages_ _pageselection_ _previouspage_ _nextpage_</font><hr> |
Please note we also have tags _recordcount_, _listcount_ and _pincount_. They return different count of results. _recordcount_ is the obvious choice of number count of results, but when filtering is used you may want to try using _listcount_ or _pincount_ to return the desired figure.
See Template Tags Referance for a full explaination of these tags
| <b> _rank_ _km_km Store: </b>_postcode_ _yourdata1_<br><b>Details:</b>_yourdata2_ <font color=blue><b>Phone:_yourdata3_</b></font><br><a href="StoreDetails.aspx?id=_yourid_">Click here for more information</a><hr> |
See in the above example we have included link to a detailed page on your web site for more information on the store. This would be optional.
<font size=1>page _pageno_ of _nopages_ _pageselection_ _previouspage_ _nextpage_</font> |
Is merged to display:
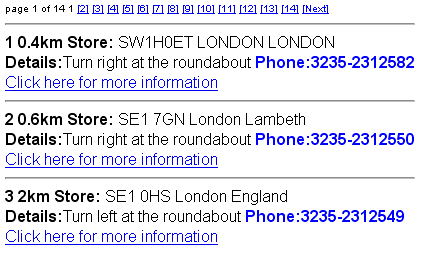
...

If a template is made in C26 then when the user clicks on a pin then the user will see that template merged with your data. More templates can be entered on C27 onwards, which will be displayed in Tabs. see "Temp 3 Map with Tabs" in example spreadsheet.
C10 of the Template sheet, contains the "NextPageURL". This template is merged with data to call the next page, when the list shows more than one page.
Paging example:
In the example template we have specified:
demonearest.aspx?postcode=_targetpostcode_&page=_page_&example=2
calls "demonearest.aspx", which would be your web page, with the page number. Which in turn calls our server again to show list for page "_page_"
If you need to pass your own parameters to this page, simply insert your own parms using a text replace function e.g HTML=HTML.replace("?postcode=","?userid=3552&postcode="), before displaying page.
See Template Tags for more detail
Step 6 Test your page
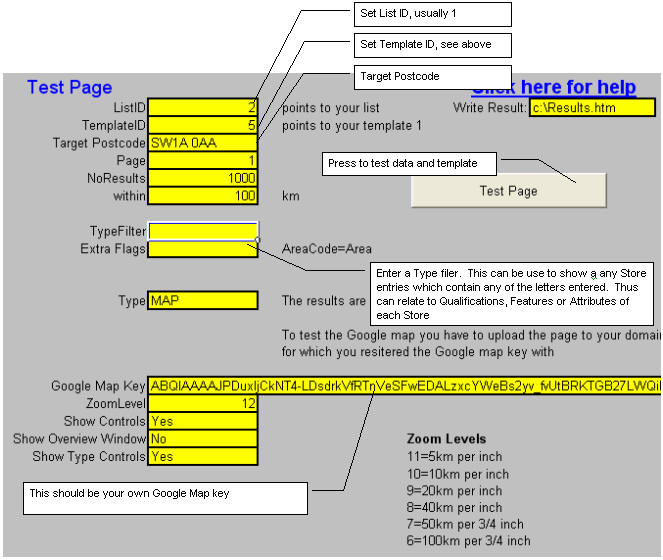
Now select the "Test page" tab in the Up loader spreadsheet, having set the settings in the settings page, to test your data against your templates
Step 7: Integrate into your Web Site
Now you are ready to integrate into your web site. Examples are included in the "Example Code" folder of download for Nearest Store up loader (downloaded in step 1). This covers many common web languages, including .NET, ASP and PHP.
The code in the examples, simply calls our web server, which return two sections of code, which are simply written to your web page. Therefore you have total control of the appearance of the List and Map, whilst being removed from the complexity of creating the Nearest store list and creating the JAVA code to draw the Google Map with Pins which relate to the Nearest Stores.
