 Download Postcode Desktop Software
You can install our Desktop Postcode Finder software in a few minutes.
Simply Postcode Desktop Software: Requirements
Our Postcode Finder Desktop Software requires:
- Windows NT/2000/XP/Vista/Windows 7,8 and 10, we do not support windows 95,98 or ME
- Broadband internet connection, if not use our local mode version
- Full access rights to install network directory
Simply Postcode Lookup Desktop Software: How to Get Started?
Simply Download Installation Program, install on your network, where all users can see the program, then on other machines simply run "ClientInstall.exe". This will open an evaluation account for one Postcode area for 30 days. Use test postcodes to test different address formats
| |
Download Desktop Postcode Finder Software |
When ready to purchase, Select menu “Options >> Manage Account/Purchase” menu, to purchase a license.
To install on other network computers
The same software can be easily copied to Laptops and other offices, by copying the installed directory ("ZipPostcodeLookup"), and simply running "ClientInstall.exe" on each machine required.
Firewall Settings
Normally you should have no problem with firewalls. If you do please open the following domain:
www.simplylookupadmin.co.uk port 80/443 (HTTP/HTTPS)
Copying/Moving Installation
All your own definitions and License is stored in the “ZipPostcodeLookup” directory. If the system is installed on a network then other computers should see your new definitions/changes/updates.
If not installed on network, then we would suggest moving the installation to the network. This can be done by:
Step 1 Uninstall if moving
Simply activate lookup window, then select “Help >> Un-Install this program” from the menu.
If installed since June 2016:Simply un-install "Simply Postcode Client Install" in windows control panel.
Step 2 Move/Copy directory
Move the “ZipPostcodeLookup” directory, to network. Note each user must have full access rights to this directory.
Step 3 Install Postcode Software Application on each machine
Install by running “ClientInstall.exe” from “ZipPostcodeLookup” directory
All settings and license should now be active.
Step 4 Test your implementation
To test your implementation we provide unrestricted acccess to a handfull of special test postcodes.
Uninstalling the Postcode Finder Software Application
To Uninstall the application:
- Simply activate lookup window, then select “Help >> Un-Install this program” from the menu.
- If installed since June 2016:Simply un-install "Simply Postcode Client Install" in windows control panel.
- To un-install from network after un-installing each PC. Simply delete the ZipPostcodeLookup directory.
Demonstration Video
| 0:00 | Download | |
| 0:35 | Install the program | |
| 1:30 | Opening account | |
| 3:18 | Agree to terms | |
| 4:20 | Install on second PC | |
| 5:00 | Purchase License |
Install on Terminal Server
Firstly install the software,from the above download, to the local drive of the RDC server using the instructions above. All users must be able to see this folder
IMPORTANT:
- This Location must be visible to ALL users
- Each user must have FULL access rights to the folder you have designated to install the software.
This will install the software on current PC only. Now to add to all Terminal Server sessions you need to put the server in install mode and then run ClientInstall.exe from the network directory you have installed the software into. You can use UnInstallClient.EXE to uninstall if need be later.
Publish to other users
While logged in a Admin user, on terminal server we publish the Simply Postcode Desktop app to other users using the following:
Open a command prompt
Navigate to installed directory, where Simply Postcode is installed, and enter:
c:\windows\system32\change user /install ClientInstall.EXE c:\windows\system32\change user /execute |
Instead of navigating to the folder, you could enter:
c:\windows\system32\change user /install \\Server01\ZipOstcodeLookup\ClientInstall.EXE c:\windows\system32\change user /execute |
If long folder names have been used with spaces in them you would need to wrap the ClientInstall.EXE statement in Quotes.
IGNORE ANY errors when installing.
Start when user logs in
Normally the client install will add a shortcut to start "lookup.exe" when the PC starts. Terminal server does not allow this so we need to use Task Scheduler to start lookup.exe when the user logs in.
So from the Terminal Server, Server Manager, start "Task Scheduler" from the "Tools" menu.
Next create a new task, but selecting "Action >> Create Task"
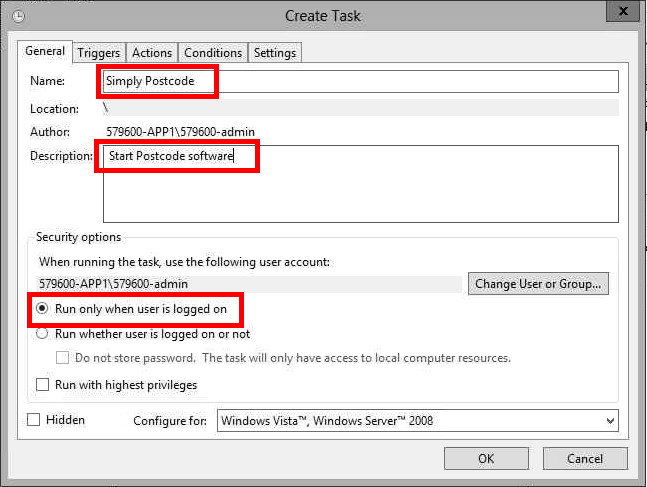
Enter a name and "Run only when user is logged on"

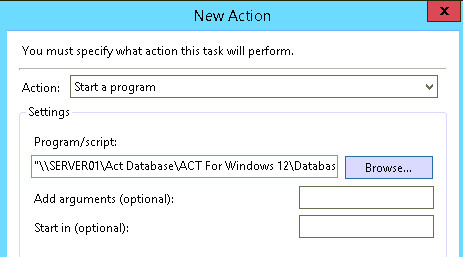
Add an action to start the "Lookup.exe" in the directory you have installed Simply Postcode in:

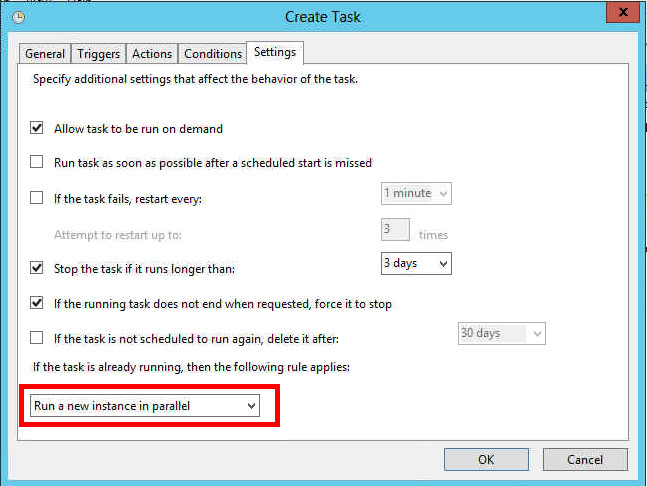
Select "Run a new instance in Parallel":

You should have now finished the install. Simply log in as a user to test.
